

How not to make a badge for an event.
Every year I make a badge for the Nottingham Gaussfest
Previous years I have just done a simple laser cut badge with a battery powered flashing LED, but this year I thought I’d do something a bit different.
My first idea was pushing the boat out a little too far, and after receiving the PCB’s I realised it would never work ( I don’t want to say what it was, as I have ideas for sort it in coming years)

So, as I was losing time quickly, I decided that I’d build a simple lightning detector. At the Gaussfest there are many, many machines that make sparks. So the idea was, when the exhibitors are making sparks, their badge lights up, what could be easier.
If I was going to do this, the badges MUST be there and working on the day. No point in having a lightning detector badge on a non-teslacoiling day.
I roughed up a circuit, based on Extreme kits lightning detector. To keep the LED on for a few seconds I used an NE555 timer.
The circuit was tested on bread-board and if I used a CMOS NE555 would run really well with a 3V supply. (Non CMOS 555’s need 6v AND take a lot more current)
I wanted to use through-hole as Extreme Kits’s lightning detector circuit used almost all of the same components but, I didn’t want ugly through hole wires on the front of the PCB, so I opted for through hole components, but surface mounted.

Happy with the circuit, I edited the PCB layout so I could get two boards in a 10x10CM order, which is the most cost efficient way of getting these PCB’s made with my supplier.
I also ordered 50 NE555 (CMOS) as the best prices came from china the PCB’s and the chips should arrive at roughly the same time.
After a couple of weeks the PCB’s and chips arrived and I quickly built one up and put in a CR2032 3v battery
It didn’t work, nothing…
Nothing I did would make it work, but everything seamed fine. Eventually I put it onto my PSU and tried it at 3V from there.
Nothing.
Scoping the output, it worked, but wouldn’t drive the LEDS, I tried every variation of LEDS I had, nothing worked (apart from a VERY dull glow).
On a hunch, I tried the circuit at 6V
Everything worked fine. Eh ???
I then occurred to me that my CMOS NE555’s (from China) may not be CMOS, I swapped one for a lone known good chip I had, the circuit worked fine. (insert swearwords here)
With not enough time to reorder CMOS 555’s, I needed a solution.

Well, CR2032’s are 3v and 3.2mm thick, CR2016’s are 3v and 16mm thick, I could fit two 2016’s in a 2032 socket giving me 6V. This worked, but the bottom battery would short. A small piece of tape sorted that quickly. The only down side now is that 2×2016’s have half the current capacity of 1×2032 and the non CMOS 555 chips are a lot more greedy. In a trial, the badges lasted 14 hours. I only needed them to last 8. I was hoping for a few days where I could put in the batteries and pack the badges. Adding a pull away tab which could turn them on, on the morning of the event sorted that. Finally I had a solution.

So, I built a batch of the PCB’s
Half of them worked, the other half refused to do anything. (insert other swearwords here)
On closer inspection the second PCB on each panel wouldn’t work.
Referring back to the PCB design I spotted my error, The fills would against ground, as I’d copied the PCB the signals for GND were no longer GND so the fills avoided the pads. All the GND connections were not connected. I didn’t have time to reorder the PCB’s
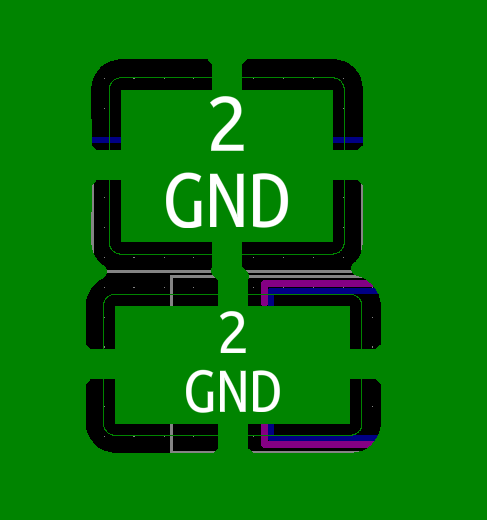

Luckily, my PCB house had done a couple of extra PCB’s, so I had JUST enough. The two organiser badges though, had a pretty addition of gold wires on the back joining all the GNDS together.

Finally a box of working badges, with only a few days to go. The only problem was I ran out of time, and I never got to test the badges with a real tesla coil or Wimshurst.

Luckily on the day they performed pretty well, If I was going to be harsh, they triggered occasionally on static discharges with peoples clothes, and their range was poor when they were close to the chest, but 1-2M away from my and other tesla coils they lit up wonderfully.
A badge being triggered by a discharge from my Shake sphere (that’s the background noise)
So my tips for designing a badge for an event.
- Start early.
- Nope, earlier.
- Order the components and PCB’s and test them all, while you still have time to reorder.
- Have a backup plan.
- it will cost more then you think, budget.
- Put a power switch on your badge. They are cheaper in time than messing with pull out tabs or populating batteries.
- If something goes wrong, don’t panic, there are many people out there who may be able to help.