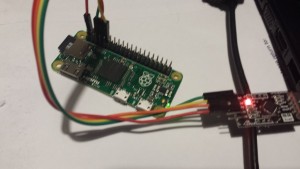
The PIZero Simple setup without network or monitor. (Requires some prior knowledge of RS232 adapters and serial port setup)
First start by getting a PI SD image I used Raspian Jesse Light https://www.raspberrypi.org/downloads/raspbian/
Install into a sd card and make sure it runs (green light at least)
With a 3.3v RS232 adapter connect earth and RX/TX to your PI. Be careful some adapters are only 5V and will damage your PI’s UART pins.
Setup your PC (I use Tera Term) serial adapter for 115200, 7 bits, even parity, 1 stop bit.
Boot your PI
If you get a screen of gobbledegook then good, otherwise swap your TX and RX around. When the gobbledegook has finished, press return a couple of times, and you should get a login prompt.
For some reason the console and boot up output at different baud rates (Caused by auto baud rate detect, settings above amended so this shouldn’t happen now)
Configure your PI the usual way. You will need some network to get your updates, but apart from that you have a working PI.
If you are brave (or idle) you can connect the +5v line from your serial adapter to power your PI too so you don’t need another usb power lead. Just be very careful that you attach it to the correct pins, otherwise your PI will be damaged.
Useful links.
(although I found the baud rate setting wrong everywhere I looked. Either auto baud rate detect at work, or it changes from distro to distro)
Element 14 no display using the raspberry pi serial console
Update:
The baud rate is auto detected, the native speed is 115200 (amended above) The auto detection only happens at the login prompt. The auto detection won’t pick up changes in bits/stop bits/ or parity. You can change the console getty port/speed/parity settings look at RPi serial connection above.
WiFi
If you have a wifi adapter and micro USB to USB lead, you can connect to WIFI. After connecting via RS232 edit the file /etc/wpa_supplicant/wpa_supplicant.conf using sudo nano
add in the lines
network={
    ssid="Your_WIFI_SSID"
    psk="Your_wifi_password"
}

and reboot the pi sudo shutdown -r

re log in to the pi and type ifconfig to fins the wifi IP address.
Then you can ssh to your PI and even better update the software.
Note : for Pi 3. You may need some changes to get the headless conf working, especially at non default baudrates, take a look at http://www.briandorey.com/post/Raspberry-Pi-3-UART-Boot-Overlay-Part-Two

